 HertzKit MUSIC TOOLS
PRACTICAL GUIDE
Gain staging: how to avoid clipping and noise
Manage levels from input to export. Investigate overloads and noise without confusing peaks, loudness or processing headroom.
On this page6 sections
Gain staging means controlling levels at each stage. Noise and distortion also depend on the source, surroundings and equipment: inspecting the chain helps identify where to act.
A linear ratio of 0.5 halves amplitude: about −6.0206 dB. That ratio is 50%, not a dBFS level or an estimate of perceived volume. In the decibel calculator, use Amplitude for audio gain and Power only for power ratios; doubling power equals +3.0103 dB.
What it means for a signal to clip
Clipping occurs when a stage cannot represent the amplitude it receives and limits the signal. At an integer PCM output, exceeding the available range may clip peaks; touching 0 dBFS alone does not prove it occurred. Floating-point processing can hold values above 0 dBFS that can still be reduced before a limited output.
Analog saturation can be unpleasant too, depending on equipment and use. If clipping was recorded, lowering the fader does not reconstruct the original peaks. Repair tools may estimate a waveform, but cannot guarantee recovery. Keep the original and record another take when possible.
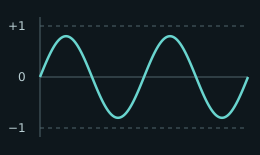
The waveform stays below the model’s limit.
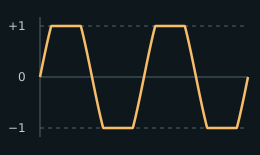
The peaks are flattened at +1 and −1.
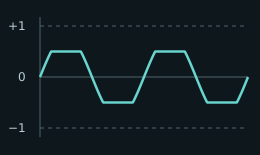
Half the amplitude; the flattened peaks remain.
Mathematical illustration, not a measured recording. All three plots use the same time and amplitude scales. The model clips at ±1; floating-point processing can retain values beyond that range before a limited output.
Gain and noise: check the whole chain
The source, room, microphone distance, preamp and conversion affect noise. Digital amplification raises both the signal and the noise already recorded: that gain does not improve their ratio. Recording louder does not remove room noise either.
Aim for sufficient signal without overloading the input. Analog gain can help relative to noise in later stages, depending on equipment. Do not sacrifice a clean take to approach a number: with a suitable chain and headroom, 24-bit recording can tolerate moderate levels.
Leave headroom without chasing a number
Test the loudest passage before recording and leave room for performance changes. An average-level reference such as −18 dBFS is useful only when you know what the meter measures; RMS, peak and LUFS are different. Interface color zones are not universal.
Check each stage and its output. Some plugins model analog equipment and respond differently to higher input levels even when the DAW uses floating point. Agree on delivery format and headroom with the recipient.
Compare without a volume advantage
EQ, saturation or makeup gain may raise the output and give the processed version an advantage against the original. Match levels to judge tone, attack or dynamics rather than volume alone.
Constant gain changes peak and RMS by the same amount while no clipping occurs; it does not compress by itself. If a processor changes the relationship between attacks and body, investigate its action and listen in context.
What to do in practice
- Test the input with the most demanding passage and keep an unprocessed take.
- Check input and output at each stage. Correct an overload where it happens; lowering the master does not repair an earlier stage.
- Compare processed and original at similar loudness using the same passage.
- Check the exported file’s peak, duration and sound. A full-scale sample counter guides review; it does not certify audible distortion.
Use the analyzer to investigate levels, the decibel calculator to convert gains and the LUFS meter to estimate loudness. The noise generator does not calibrate playback sound pressure or measure physical room noise.
Technical reference: Audacity: sample formats and processing headroom. Example levels are not universal recording requirements.